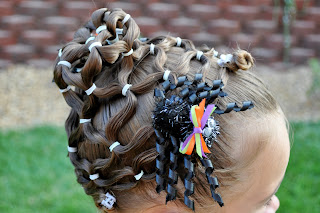
Now this one does require some time so make sure you don't plan to do this with only 5 minutes to spare. :) Also, you can recycle this style to create LOTS of different looks. I'll add some more tomorrow. You'll see that it is worth the time that goes into it because you can get a few days of styles out of it.
Here are the little spider clips my princess and I made specifically for this hairstyle. Aren't they cute?!
Have the hair completely wet and begin with a very TIGHT ponytail in the back of the head. Make sure you gather all of the hair up into it.
Now grab whatever color of elastics you want for the netting. We started ours by breaking the ponytail into 6 small sections and tying each off with an elastic 1/2 inch above the starting elastic. You'll want to pull each section outward along the head so that they are spreading out.
*Tip: Use small claw clips to hold the sections you are not working with in place.*
Divide each new section into two equal pieces. Combine the right piece and the left piece from the adjacent section with an elastic. Continue doing this around the entire head until all 6 elastics are in for your second row of netting.
Continue adding rows of netting as far out as you can go. (It will depend on the length of your princess's hair.) When you've reached a point where you're netting is finished, simply roll any extra hair into a small twist bun and secure it with a tiny claw clip. You could also curl the ends if you would like, my princess just had tiny ends left over.
Now you can grab your spider clips and add them wherever you like on your web.
Don't forget to check back to see the "Haunted House", "Trick or Treat Bag" and a couple fun updos you can do using this hairstyle. :)


Hiç yorum yok:
Yorum Gönder