tools etiketine sahip kayıtlar gösteriliyor. Tüm kayıtları göster

30 Kasım 2012 Cuma

Friday's Film: Wrapped Band

This is a very simple style that you can do any morning and not have a huge time commitment.  You will need a stretchy headband and a Topsy Tail if you have one but it's not required.  
Pretty simple huh!
 Here's what the back looks like.
 Here's a shot of the side that wasn't shown in the video.
You can choose any sort of fancy stretch band to use.
I love hairstyles that are fast and easy!
*AWESOME PRODUCT ALERT*
Car Seat Cover with Bug Net
So I don't promote really anything on  this blog but you have to check out these car seat canopy's with the bug covers.  They are FANTASTIC and I have loved mine!  My cute sister-in-law makes them and you can see her shop on Esty here so go check it out!


10 Eylül 2012 Pazartesi

Super-Sized Bun

I love experimenting with new supplies and tools so it's always fun to find a new little gadget.
I was out shopping the other day when I came across a super-sized bun mold at Claire's. 
 I bought this more specifically for myself but my princess wanted to wear it in her hair for church. 
I loved how it looked in her hair and we had several compliments on how elegant she looked.  
You definitely need hair past shoulder length for this bun mold because it requires lots of hair to cover it.  Start by simply pulling all of the hair back into a ponytail.  (The best results come from using wet hair.)  It can be a low, high or a side ponytail - it doesn't really matter.  Now slip the mold over the entire ponytail and the elastic.  Have your princess tip her head down and spread the hair evenly around the mold with a comb.
  Secure it into place by slipping another elastic over the hair and the mold.  Take the excess hair and divide it into at least 3 sections and twist or braid them.  Wrap those sections around the base of the bun mold and bobby pin them into the mold to secure them.  
You can either have your tiny little ends flare out or tuck them under to conceal them like we've done here.  Add a flower clip on the side if you like and it's finished.     

2 Mayıs 2012 Çarşamba

Bun Spiral

 My princess has her hair in buns all the time for swimming and dance but they always seem to be falling out when her activity is over. 
 I grabbed this handy little tool in the hopes that it might solve our problem.  It's called the "Bun Spiral" by Goody and I picked it up at Walgreens. 
You start by pulling all the hair back into a ponytail as usual.   
Now twist that ponytail and wind it around your elastic to create your bun.  Tuck your ends under as best you can at this point.  Now grab the Bun Spiral and slip it over the bun - so that the purple tips are next to the head. 
Now simply spin it clockwise until it won't spin anymore and this locks it into place.  I have to admit that I was pretty impressed.  It holds that bun VERY tightly in place and her bun looked just as beautiful after school as before.  I give this one a thumbs up!

23 Aralık 2011 Cuma

Friday's Film: Hair Tinsel

I've been dying to get this post up for a while now because it's just so much fun.  We've saved it for Christmas time because it's easy to find tinsel around this time of year. 
This is the tinsel that we've used in the video and it is specifically for hair.  I couldn't find it at any of the beauty stores but I was able to get it online through Ebay.  It's nice because it is super thin and blends right in with the hair.  It can also be washed and styled right along with your regular hair and can withstand dryers and irons.  Regular Christmas tinsel can be used for just a fast temporary style but do not use any heat on it and I recommend that you not leave it in the hair for more than a day.  It is a bit thicker as well which makes it a bit harder to attach but it can be done and it look so cute!

It's really important to get your tinsel tied in as close to the scalp as possible to get the most natural look.  (It gets easier each time you apply it)
I made sure to place the tinsel along her natural part and also keep it even on both sides.
The tinsel we have here will last up to two weeks in the hair so you will probably see it in a couple future posts.  :)  It took about 20 minutes total for all the strands but that wasn't much time considering.
We purchased the "sparkle" tinsel because I loved the way the light refracted off of it but you can get the regular metallic as well and it comes in all sorts of colors. 
This hairstyle would be great for a soccer/dance/cheerleading team or when going out to a game because you can choose the perfect colors to show your support!
The pictures don't do it justice because you just need to see it in person but - trust me - it is beautiful!

15 Aralık 2011 Perşembe

Holiday Hairstyles: Winter Wonderland

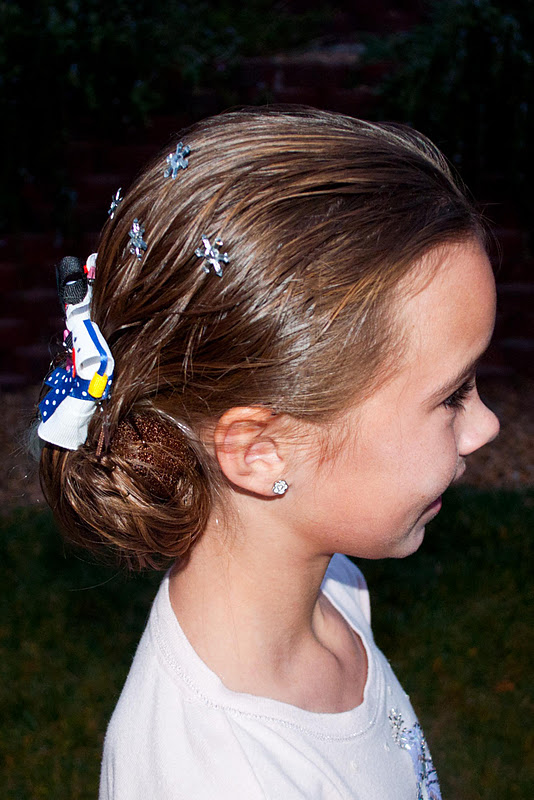
*I apologize in advance for the darker pictures but we did this hairstyle for a Christmas party in the evening so the sun had already gone down.*  We call this one the "Winter Wonderland" and we don't get any snow where we live so it was fun to create a snowy scene in her hair.  :)
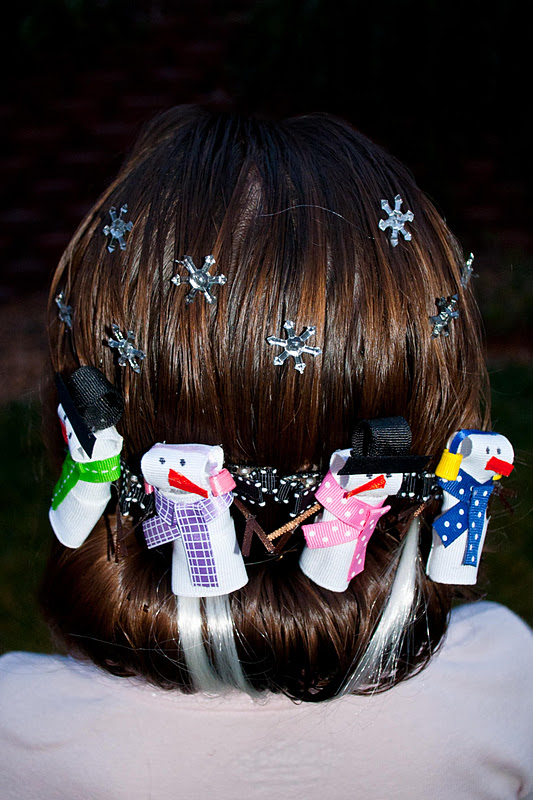
Here are the supplies we used and I know that they're not necessarily supplies that you would have readily available but you can be creative and use what you have!  First we have a jumbo twist form and some white faux hair that we got at Sally's.  (You could use a pair of long rolled socks and ribbon as substitutes.)  There are also some little snowflake jewels that we just glued to hair pins but you could also use regular rhinestones.  Finally we have some snowman hair clips and I made these ones out of ribbons and alligator clips but you could make some simple ones with cotton balls and hair pins if you wanted.
Begin with wet hair and comb it all straight back.  Clip your faux hair underneath the other hair by the nape of the neck.  Now grab your twist form and place it at the ends of the hair.  Roll it upwards into the head until you have it nice and tight.  You will want to make sure that you are spreading your faux hair out a bit as you roll as well so it's not all in one clump.  Once your form is tightly against the head, secure it in place using bobby pins.  This is our hill of snow for our Winter Wonderland.
Now go ahead and place your snowman clips on top of the hill of snow in any way that you like.  (You could also make tree clips and use those as well or in place of.) 
Your final step is to make it look like it's snowing by inserting your hair pins in random places above the snowmen.
Now you've created a Winter Wonderland picture through a hairstyle.  It also looks like one of those over-the-top Christmas sweaters that Grandma used to wear.  :) 

11 Kasım 2011 Cuma

Friday's Film: Hair Pin Tutorial

I've had a request for a video showing how to make the hair pins that we use in several of our hairstyles.  They are very simple, very fast, and very affordable to make.  You will need some unused hairpins or bobby pins, a glue gun, & a flower/notion/ribbon for your focal point.
I told you there were easy!
Here's a finished product from the one I made on the video.
They are so fast to make that I was able to finish all of these in about 30 minutes.  I make sure to always have multiples of the same kind because I use all of them in certain hairstyles.  (I found these cute little knitted flowers on Etsy.com and they were super cheap.)
Here are some other examples of pins that I've made.  (You may recognize some from hairstyles we've posted.)  I just keep them in these little craft boxes from Walmart and they stay nice and organized.
Here are just a few of the hairstyles we've used these in:

The Rose Bowl

Baptism Picture Hair

No Go Without A Bow

Pot O' Gold

Double Layered Bun
As you can see, there are lots of ways to use them and they look great in adults as well as kids! 
Happy hair pin making!

5 Ekim 2011 Çarşamba

Hairagami With a Braid

Here's another fun idea of a hairstyle using the Hairagami. 
 
We found ours at Walgreen's but I'm sure they're at other places as well.
I started by pulling all of the hair back into a ponytail.  I then grabbed a small bit of hair that I wrapped around the elastic and tucked back in just to hide the elastic. 
 Next, I divided the ponytail into a top half and a bottom half.  I wrapped the top half into the Hairagami, rolled it into the head and bent it into place. 
I took that bottom half of the ponytail and created a 3-Strand braid out of it. 
I secured it at the bottom with an elastic and then pulled that elastic up inside the Hairagami and secured it in place with bobby pins.  This step is not necessary and it does look cute with the braid just hanging as well. 

13 Eylül 2011 Salı

Puffy Pull-Throughs

Here's a 5 minute style that is simple and fun. 
 
I call these "Puffy Pull-Throughs" but my daughter refers to them as "Hamster Ears". Section out the hair from ear to ear and then divide it into two sides.  We've created an off-centered part on ours so our sides are not even but you can do it however you like. 
 Pull each side up into an elastic.  Now grab your Topsy Tail and create a Pull-Through.  At this point you can either use a rat-tailed comb or your fingers but I find that the comb makes it a bit easier. 
 Hold onto the elastic in the Pull-Through and simply grab bits of hair to pull toward the forehead - loosening them from the elastic.  You can make your puffs as large or as small as you like and you can pull out as much or as little hair as you like. 
 These were so easy and fun that I will be using them on hairstyles in the future!
  We just let the rest of the hair fall down in waves but you can finish off the back in any way. 

15 Ağustos 2011 Pazartesi

Hairagami

I found this cool product at the store the other day and had to pick it up to try. 
 It's basically 2 slap bracelets that are sewn together that you place your hair between.  It's actually a fun little gadget.  There are several different hairstyles you can create with this little tool but here is one that we did that took us exactly 1 minute!!!  
 My princess had just jumped out of the shower so here hair was nice and wet and I pulled it all back into a ponytail.  I then flattened out the Hairagami and opened the two pieces.  I placed all of the ponytail between the two pieces and then pulled the Hairagami down to the ends of the ponytail. 
 I rolled the gadget up to the elastic - making sure to spread the hair evenly over the Hairagami as I rolled - and then pressed on it to curl it up. 
You can shape the curled Hairagami anyway you like and we did it in a cinnamon bun fashion. 
 We finished it off by adding a flower clip and we were done. 
It held very tightly throughout the whole day and even gave us some cute curls when we took it out.
  I'm excited to try some new styles with it so I'll post everything we do!

27 Temmuz 2011 Çarşamba

Curlformers

We use these all the time but I've never down an official post on these overnight curlers.  They are called Curlformers and their link is here. 
They are really fast to put in and they don't create the tight curls that the small pink sponge curlers do.  My princess think that the larger curls are more "grown up".  :)  I start right after she's had a shower or bath so that the hair is completely wet.
  I style the hair the way I want first and then I put the curlers in. 
 You can either have your princess sleep in the curlers overnight or just keep them in for about 3 hours to dry.  
 They hair was styled before you put the curlers in so you don't have to worry about ruining your curls. 
Our style here was a simple Pull-Through on the top of the head and then I pulled half of the hair up in the back.  I made sure not to include that Pull-Through in my half-up hair because I wanted the curls hanging down.
The end result are beautiful, soft curls that will last the whole day through! 
 I've only been able to find these at Sally's but I've also heard that they have a knock-off brand on Ebay.  :)