30 Ekim 2010 Cumartesi

Photobucket
It's halloween and I can't sleep so I am spending my night watching horror movies. x


these are some sketches i did last week, they are not good,some i havent even finished but i wanted to show you what is inside my diary. x

the flower said i wish i was a tree the tree said i wish i could be a different kinda of tree


hat camdem market, jacket second hand, shoes primark, shirt vienna.

29 Ekim 2010 Cuma

Halloween Hairdos: Spooky Clips

This is our final post in the "Halloween Hairdos" collection and it's not really a hairstyle but I thought I'd include it anyway.  I've been getting a lot of comments on the clips that we're using in the pictures.  I thought I would show you some of our favorite Halloween clips and you are free to copy any ideas that you like.  (Even though time is quickly running out.)  :)  We only have one of each pictured below but I ALWAYS make two of each clip so I can do any hairstyle and have what I need.  I've made of few of these this year but most of them come from years past.  Hope you like them!
These are our ghosts and candy corns.  We also have a few Korkers that we love but this is one of our favorites.
Here is our candy collection and these were super simple because I just bought them already made in the scrapbook section of JoAnn's and then glued them to clips.
Here are our pumpkins.  There are so many ways to make a pumpkin clip and you can pick the ones you like the best.
These are our witches and black cats and we've also thrown in our Halloween Disney clip. 
This one is just everything else - a bat, a couple spiders, a scarecrow, a mummy, Frankenstein and the skull.  My princess loves the Skull and Cross Bones and I love the Frankenstein.  The Mummy was one that I made yesterday just to see if it would work and it turned out pretty cute.
These are our favorite ribbon clips.  They always look cute with braids or ponies. 

28 Ekim 2010 Perşembe

19 .. 1991


Hello there! Today is my birthday I mean yesterday because now it's already 00:41 and it confirms that I am definitely 19 years old now and I feel strange. I don't like getting older because getting older implies in being responsable and having to think a lot about future and apart from presents and good food birthdays are totally bad. Anyway I just gotta get over it.. so hopefully I had a good day and I received nice gifts and had a wonderfull carrot cake with chocolate frosting which I am having it for breakfast tomorrow haha, and the party will be in two weeks time. Right now I feel completly tired and I'm going to sleep , btw thanks for everyone who wished me a happy birthday on facebook. besos

27 Ekim 2010 Çarşamba

Halloween Hairdos: Kitty Cat

We found these cute little clips at our local craft store and thought they would be fun to incorporate in a hairstyle. 
My princess has really been wanting to try a Faux-Hawk hairstyle so we used it for these clips. 
Start by dividing the hair into 4 parallel sections horizontally across the head.  Gather each section up into it's own ponytail in the very center.  This will give you a row of 4 ponytails. 
Now you're going to wet them down really well and Barrel Roll them.  To Barrel Roll you will comb the ponytail straight up into the air and then wrap the ends around your two index fingers.  Now roll your index fingers over each other down towards the scalp.  This will roll the hair nice and evenly for you.  Secure your Barrel Roll down into the hair with a bobby in on each side creating an "X" inside the roll.
  Do this with your 3 other ponytails as well.  You will end up with a Mohawk look going down the head. 
 Now add your little clips up at the top and you have a kitty cat.
   Or you can also have a devil as well. 
We also have these little kitty cat ears from a while back.  They are just two simple brown pipe cleaners that we've wrapped her hair around.  We started with a small section of hair by each ear and then secured them in the middle of the head with a little barrette.

26 Ekim 2010 Salı

Halloween Hairdos: Pumpkin Patch

This one was so fun for me to do and it turned out really cute.  (Even thought I wish I would've had a bit more orange ribbon for the pumpkin buns.)
I began be dividing the hair in half horizontally across the head.  Pull each half into a ponytail close to the part.  You'll want one ponytail to be a little off-centered to the right and the other to be off-centered to the left.  Grab two bun molds and slip them over the ponytails.  Spread the ponytail evenly around the mold and secure it down with another elastic. 
 Now take the remaining hair on each bun and twist it together in a Corkscrew.  Wrap the Corkscrew around the bun and secure the ends in with bobby pins. 
 Now grab your plastic yarn needle and thread some orange ribbon through it.  Take your ribbon under the bun to begin and bobby pin the end of the ribbon down under the bun to hold it in place.  Now just take the ribbon up over the bun and thread your needle back underneath.  Wrap it as many times as you like to make it look like a pumpkin.  Finish it up by threading the ribbon under the bun one final time and secure the end of the ribbon down with a bobby pin.  Do the same on the other bun as well. 
Now grab a green pipe cleaner for each bun and make the step and vines by twisting it around a pen.  Stick the end down into the bun mold and it will hold just fine.  We've also added some other fun little pumpkin clips to the hairstyle to make it look more like a "Pumpkin Patch".

25 Ekim 2010 Pazartesi

Halloween Hairdos: Cemetery

This is another one of those "for fun" hairstyles that is great for a Halloween party or some other festive outing. 
First we found some tombstone coloring images online and my princess colored them for me.  Then we just cut them out, sealed them with some packing tape, trimmed them up to look nice and then glued some bobby pins on. 
 Next I sectioned off her hair into 4 equal sections going horizontally across her head.  I secured each section with an elastic right in the middle.  Now make sure the 4 ponytails are really wet and divide each one into 3 pieces. 
Twist each piece as tightly as you can and let them wrap themselves up and create a "Worm".  Secure the end of the Worm into the hair with a bobby pin.  Do this with every piece from every ponytail until you have lots of little worms. 
My princess called it a "Worm Mohawk". 
Now place your gravestones anywhere you like to give it that hillside cemetery look. 
 My princess made me turn off all the lights in the bathroom and show her what it looked like with a flashlight shining on it like the moon.   
She said it was "Awesome"!  :)

I think of you when I am doing the dishes


a few pictures from last week

24 Ekim 2010 Pazar

Video for "The Cast" and "The Mummy"

We've been getting lots of requests for this so here it is.  Next time I should probably not be in my pajamas!  :)  I didn't think I was in the shot... so sorry.  We are new to this whole posting a video thing. I'm also sorry that the quality isn't excellent.  Hopefully this will help some of you that have been asking about this hairstyle.  (Don't mind my princess pulling faces in the middle of it.  One of them looks as though she's wincing in pain but I assure you that isn't the case - she's just a goof ball.)
See, I told you it was really quite simple!  Just have yout elastics ready, your Topsy Tail and comb handy and make sure the hair is wet.
(P.S.)  Topsy Tails can be bought on Ebay if you can't find one.  Any of them work but the Scunci ones seem to be the strongest. 

that's your deal that's not my deal


Hi there! I am ill due to the cold weather,therefore I am taking medicine at this very second. Today I went to wembley market and visited a few charity shops but couldn't find anything really. Then I came back home to warm myself up. I watched the film 'Notting Hill' for the second time. :) Oh and regarding to that contest post below, the winner will be notified soon. Well now I must rest.

Halloween Hairdos: Candy Corn

So I'm kicking myself that I didn't get pictures before my daughter went to school today.  These pictures don't do the hairstyle justice because they were taken after a long day of wind, recess and P.E.  It really is such a cute hairstyle and actually has the triangle shape of a Candy Corn - which it no longer has in these pictures.  :(
Start with a section of hair from the top-middle and secure it with a white elastic.  Now divide the rest of the hair in half by creating a part in the middle.  Section out some hair on each side from the ear up to the middle part.  Now divide your first little ponytail into two pieces and give one piece to each half and secure these with white elastics.  (Make sure your elastics are exactly in the middle of each section.)  Divide the right ponytail into two halves and take one half across and add it into the left ponytail with another white elastic.
 
Section off another area on each side that is about 2 inches below the previous.  Add your two existing ponytail into each new section and secure them with orange elastics slightly farther apart than the previous two white elastics.  Divide the left ponytail into two halves and take one half across and add it to the right ponytail with another orange elastic.  Gather the remaining hair on each side of your middle part - making sure to add in your existing ponytails and secure each side with a yellow elastic.  Remember to have these final two ponytails as spread apart as possible to create that triangle shape.  Now divide the right ponytail into two halves and take one half across and add it into the left ponytail with another yellow elastic.
 
 Grab some white, orange and yellow ribbon and your plastic yarn needle for the weaving.  Thread your white first and wrap it around the top triangle of the Candy Corn.  Secure your ends into the elastics and thread the needs with your orange ribbon.  Wrap that around the next section of your Candy Corn and secure the ends into the elastics. 
 Finally, thread the yellow ribbon and wrap it around the final part of your Candy Corn.  (My princess's yellow section got really loose by the end of the day so you may want to make extra sure that your elastics are tight and your ribbon is tight.) 
 We've added some little Candy Corn clips to finish it off.

23 Ekim 2010 Cumartesi

Halloween Hairdos: Minnie Mouse

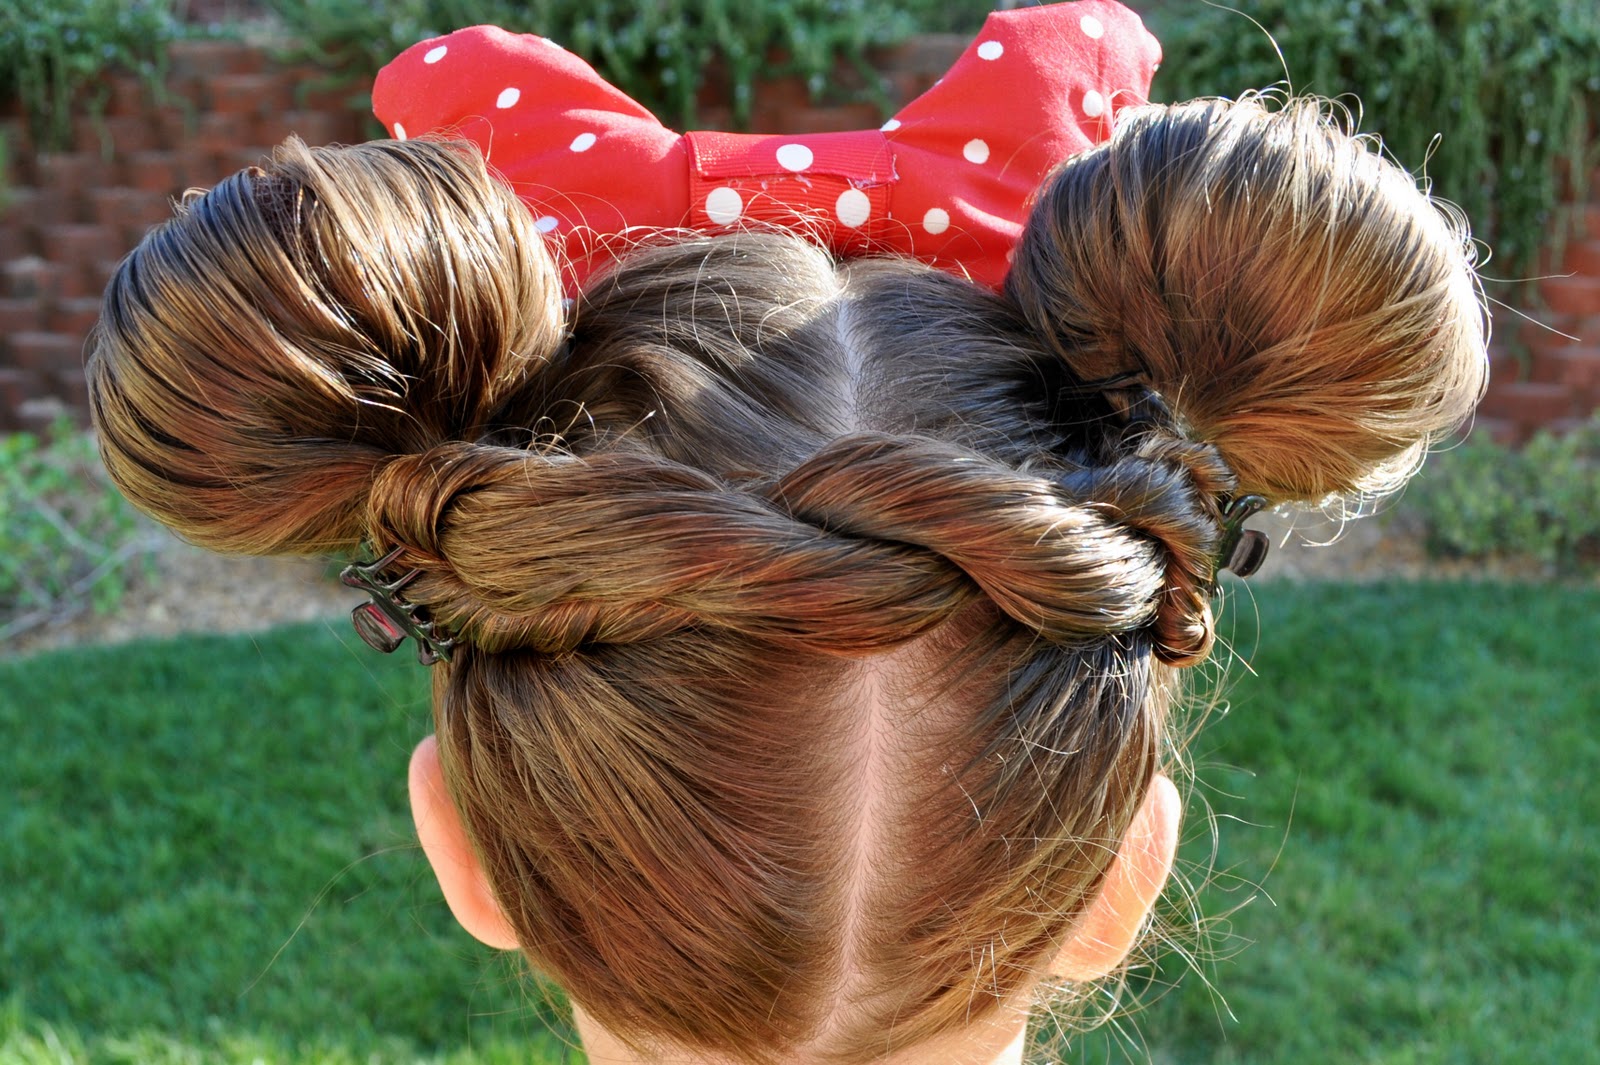
So let's be honest... this isn't really a "Halloween Hairdo" but I thought I'd post it in case anyone out there is doing Minnie Mouse as a costume.  This is more a hairstyle my princess just wears all the time.  :)  It's also our official "Disneyland Do". 
Grab two bun molds (or rolled socks) because they are a must have for this style.  Part the hair into two halves and pull each half up into a very high ponytail.  
Now pull each ponytail through a bun mold and spread the hair out to cover the entire thing.  Tie an elastic around the mold but leave it just a bit loose. 
Now tilt the mold up so that it is facing the front of the head.  This will pull some hair through the elastic a bit more but that is what you want.  Now secure the bun molds in the upright position with bobby pins.  I use about 6 pins on each mold just because we usually want a nice tight hold. 
Pull the excess hair back behind each mold and twist it so that all the strand are tight.  Now cross them over one another on the back of the head and hold them together with a claw clip on each side.  Tuck any loose ends back behind the twists.  Spray it really good with hairspray and it shouldn't budge.   
This is a bow that I made to mimic Minnie's actual bow and it's just stitched fabric with an alligator clip on each end of the bow to hold it in place.  It would also look cute with a headband and red flower clip. 
Clip your bow right in front of your Minnie ears and she'll look perfect.  
If you don't have any bow that works, you can always leave it out and just go with the Mickey ears.  It's still absolutely darling!